A complete iOS + OpenCV sample project
The conflict occurs because both UIKit.h and opencv_core.h define the same MIN symbol. But in UIKit it’s a function, and a macro in OpenCV. If you include bot iOS framework and core.h header file from OpenCV they will conflict with MIN symbol because iOS define MIN function, but the OpenCV has the MAX macros. The simple way would be to ask OpenCV maintainers to give other name to MIN macros. But it’s too easy and i do not believe it’s right solution.
The correct way is to split the business logic from the presentation layer into different parts of the project, so the iOS frameworks and OpenCV includes never appears in single compilation unit.
In this tutorial i consider a sample application, which takes images from the photo album, does some image processing and then displays the processed bitmaps to the user. So the idea to differentiate the UI from the image processing.
Let’s do it in this way.
- Declare the API interface used by the View. This API is the only thing that View know about.
- Write and particular C++ implementation of the image processing component.
- Write an implementation of the API protocol that implements desired methods and delegates calls to the C++ implementation doing data conversion if necessary.
A small diagram that illustrates the idea:

Here is a code of the protocol declaration:
| |
As you can see it’s pretty simple - it sends the image to processing component and return the result. I pay your attention to the fact that user code at this point know nothing about OpenCV. In the view you work with this API like this:
| |
Now let’s write the actual processing code. In this project I use Boost.Gil to pass raw image data to OpenCV because I prefer this strongly typed image concepts very much and use Boost for it is a good choice. You can read about Boost.Gil here: Boost Gil library overview.
Declaration of OpenCVImageProcessor class:
| |
Implementation:
| |
Almost done. Now we have write and implementation for the ImageProcessingProtocol (I omit the image conversion functions because they are pretty standard and simple):
| |
And that’s all. With this approach you receive flexible design with strict API and platform-independent implementation. You probably can even port it to Android platform by simply writing an adopted ImageProcessingAndroidImpl wrapper.
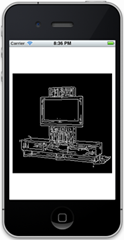
The final application looks like on this screenshots:

At startup user asked to choose the source image by tapping on screen and then the detected edges are shown. To choose another image – just tap on the screen again.
Advantages:
- No explicit dependency from OpenCV in your UI.
- No violation of MVC and SRP paradigm.
- The View code looks more clear and easy to understand.
- Really cross-platform solution.
Disadvantages:
- Need to write a bit more code.
- You need some proxy types to pass Obj-C data (images) to the OpenCV. I use Boost.Gil for this.
Conclusion:
The source code for this sample can be found on my GitHub: https://github.com/BloodAxe/opencv-ios-template-project.