In the previous step we created Master-Detail XCode project and linked OpenCV library to it. Also we defined a base interface for all samples. Today we’ll write some UI logic to integrate our samples into the application.
One ring to rule them all
Since we are going to store a lot of samples (i hope so), we have to store them somewhere. I think for our application the ideal place to save them is our application delegate class. Since we create instance of each sample only once at startup and they required to be alive for all application lifecycle there is no better place to store them:
We initialize vector of samples at application startup point like that:
1
2
3
4
5
6
7
8
9
10
11
12
13
14
15
16
-(BOOL)application:(UIApplication*)applicationdidFinishLaunchingWithOptions:(NSDictionary*)launchOptions{allSamples.push_back(newContourDetectionSample());allSamples.push_back(newEdgeDetectionSample());// Add a lot of other samples here ...
// Override point for customization after application launch.
if([[UIDevicecurrentDevice]userInterfaceIdiom]==UIUserInterfaceIdiomPad){UISplitViewController*splitViewController=(UISplitViewController*)self.window.rootViewController;UINavigationController*navigationController=[splitViewController.viewControllerslastObject];splitViewController.delegate=(id)navigationController.topViewController;}returnYES;}
To access our sample collection we will use following snippet:
-(NSInteger)numberOfSectionsInTableView:(UITableView*)tableView{return1;}-(NSInteger)tableView:(UITableView*)tableViewnumberOfRowsInSection:(NSInteger)section{AppDelegate*appDel=[UIApplicationsharedApplication].delegate;returnappDel->allSamples.size();}-(UITableViewCell*)tableView:(UITableView*)tableViewcellForRowAtIndexPath:(NSIndexPath*)indexPath{AppDelegate*appDel=[UIApplicationsharedApplication].delegate;SampleBase*sample=appDel->allSamples[indexPath.row];UITableViewCell*cell=[tableViewdequeueReusableCellWithIdentifier:@"Cell"];std::stringsampleName=sample->getName();cell.textLabel.text=[NSStringstringWithCString:sampleName.c_str()encoding:NSASCIIStringEncoding];returncell;}-(BOOL)tableView:(UITableView*)tableViewcanEditRowAtIndexPath:(NSIndexPath*)indexPath{// Return NO if you do not want the specified item to be editable.
returnNO;}
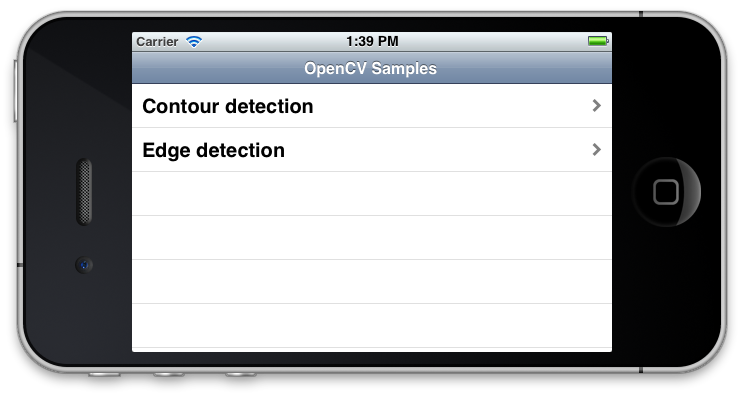
This will give us following look of the master view:Screen Shot 2012-06-24 at 1.39.37 PMNow we have to tell application how to react when user taps on particular sample. When this happes application should navigate to detail view and show sample detailed description, it’s icon and “Run Sample” button. To do this we override following selection callbacks:
In these methods we initialize detail view with instance of selected sample and present it. Two different methods is necessary since our application supports both iPhone and iPad devices, so we have to support both idioms.
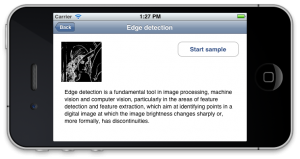
Displaying sample in detail view
Screen Shot 2012-06-24 at 1.43.34 PM
The detail view has large text view to present sample description text, also it shows sample icon and a “Run Sample” button that starts this sample. The DetailViewController updates content of this view with the given sample using the configureView method, which is called when the sample is selected in master view. Each sample can have it’s own icon image (150x150 pixels for iPhone and 300x300 for iPad). To make our app look like a pro we add this feature since no one loves text without illustrations.
When a DetailViewController is shown it update it’s state with a corresponding sample object using following method:
-(void)configureView{// Update the user interface for the detail item.
if(currentSample){std::stringname=currentSample->getName();std::stringdesc=currentSample->getDescription();std::stringicon=currentSample->getSampleIcon();NSString*nameStr=[NSStringstringWithCString:desc.c_str()encoding:NSASCIIStringEncoding];NSString*descStr=[NSStringstringWithCString:name.c_str()encoding:NSASCIIStringEncoding];self.sampleDescriptionTextView.text=descStr;self.title=nameStr;if(!icon.empty()){NSString*iconStr=[NSStringstringWithCString:icon.c_str()encoding:NSASCIIStringEncoding];self.sampleIconView.image=[UIImageimageNamed:iconStr];}else{self.sampleIconView.image=nil;}}}
The “Run Sample” button will launch this sample, but now it does nothing since we haven’t wrote any image processing code. In the next part we create a SampleViewController to present results of image processing and write our first sample - Edge Detection demonstration.
Let me stop right now and wish you good luck with studying OpenCV and iOS development. You can find project sources at OpenCV Tutorial repository on GitHub.